Slicing
In ATL, you can reference a single element in a sequence — e.g. a value in a list, or a character in a string — by using bracket notation and specifying the positional index of the element. For example, [[myList[0]]] references the [[myList]] value at Index 0.
Slicing is similar but uses two indexes — a start index and an end index — to reference a specific subset of the sequence. You can achieve this effect with ATL functions (see sublist and substring) but slicing is often quicker and makes for simpler ATL.
Zero-based indexing
Slicing uses zero-based indexing, meaning the first element in a sequence is assigned Index 0 rather than Index 1. Indexes can be counted forward from the start (positive numbers) or backward from the end (negative numbers). This is shown in the diagram below.
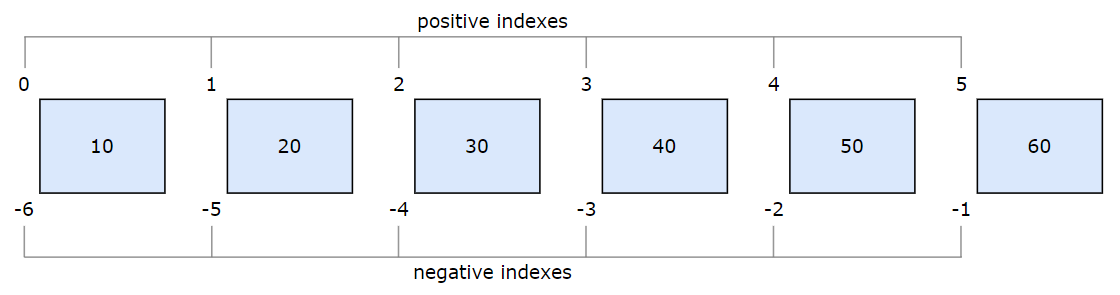
Each block represents a value in a list of numbers. Each value — i.e. each position in the sequence — has two indexes, one positive and one negative. You use this indexing system to define start and end indexes for your slice.
Syntax for slicing
The basic syntax for slicing:
input[startIndex:endIndex]Parameter | Description |
|---|---|
| The input data. This can be a list, string, or array. |
| The start index for the slice. The start index is inclusive. Use zero-based indexing. The start index is optional. The default is Index 0 (the first element). |
| The end index for the slice. The end index is exclusive. Use zero-based indexing. This end index is optional. If unspecified, the slice will include all elements from the start index onward. |
Note
You can omit either or both indexes, but you must always include the colon. Note that the examples below all use integer numbers directly in the slicing expression; however, you can equally use variables that return an integer value.
List slicing
Each list value — i.e. each position in the sequence — has a positive index and a negative index. The values can be of any type (numbers, strings, lists, etc.), but for simplicity we'll use a list of numbers. In the diagram below, the input is a list of six numbers.
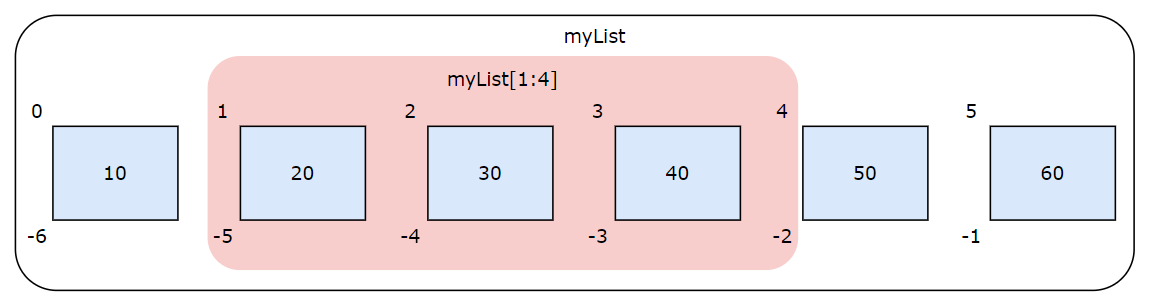
The ATL [[myList]] returns the whole list. The ATL [[myList[1:4]]] returns a slice comprising the second, third, and fourth values only, as shown in the pink area above. Remember, the end index is exclusive, so the fifth value (at Index 4) is excluded.
Also, remember that every position in the list has two indexes, one positive and one negative. Therefore, the ATL [[myList[-5:-2]]] returns the same slice as [[myList[1:4]]]. You can mix positive and negative indexes — e.g. [[myList[1:-2]] or [[myList[-5:4]]].
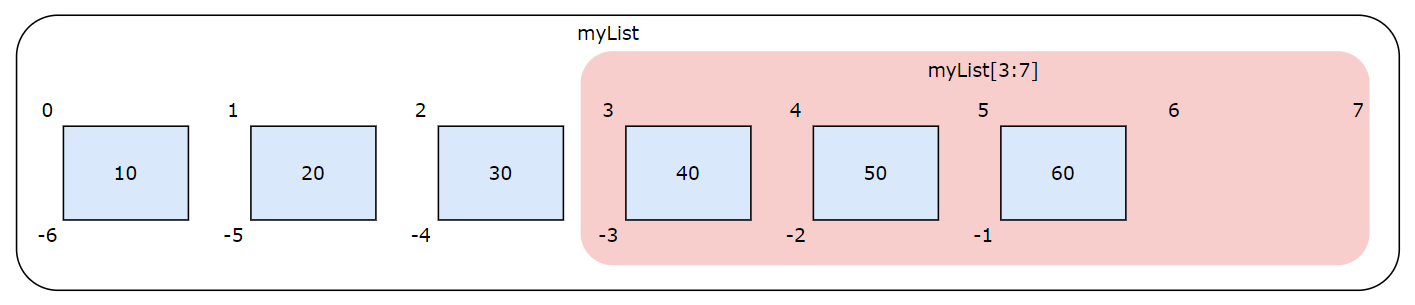
You can specify index values that go beyond either end of the list. Any parts of the slice extending beyond the actual list are ignored. Using the example list above, [[myList[3:7]]] returns a slice comprising the values at Indexes 3, 4, and 5.
Note
If a slice does not capture any elements in the list — e.g. [[myList[3:3]]] — the result is an empty slice. You might deliberately create an empty slice to add values to a list — see List slice assignment for guidance.
Default behavior — start index and end index
If the start index is unspecified, the default is Index 0.
ATL in Script | Returned Slice | Printed Result |
|---|---|---|
[[ myList = (10, 20, 30, 40, 50, 60) myList[ :3] ]] | (10, 20, 30) | 10, 20 and 30 |
If the end index is unspecified, the slice includes all values from the start index onward.
ATL in Script | Returned Slice | Printed Result |
|---|---|---|
[[ myList = (10, 20, 30, 40, 50, 60) myList[-3: ] ]] | (40, 50, 60) | 40, 50 and 60 |
If the start and end indexes are unspecified, the slice captures the whole input list.
ATL in Script | Returned Slice | Printed Result |
|---|---|---|
[[ myList = (10, 20, 30, 40, 50, 60) myList[ : ] ]] | (10, 20, 30, 40, 50, 60) | 10, 20, 30, 40, 50 and 60 |
Note
The Printed Result column shows how Studio prints the slice in the output narrative — that is, as punctuated text. You can control list formatting via the project settings. You can also override the settings with the list function.
List slice assignment
List slice assignment allows you to replace a list slice — i.e. a subset of the list — with another list of values. You can also use this method to add values to a list (no values are replaced) or delete values.
The syntax for this method is:
input[startIndex:endIndex] = newListThis is similar to the previously shown syntax for slicing. The additions are the equals sign and the newList parameter, which you use to define a list of replacement values. The newList values replace whatever is captured in the slice.
Note
In the examples below, the newList input is either defined ad hoc in ATL (by placing round brackets around a comma-separated list of values) or created using makeList. This is to keep the examples clear. In practice, the input to this parameter is usually a variable that returns a list of values.
Examples for list slice assignment
You can use list slice assignment for three purposes:
Replacing list values
ATL in Script | Resulting List | Printed Result | Notes |
|---|---|---|---|
[[ myList = (10, 20, 30) myList[ : ] = (40, 50, 60) ]] | (40, 50, 60) | 40, 50 and 60 | The slice captures the whole of |
[[ myList = (10, 20, 30) myList[1: ] = (40, 50, 60) ]] | (10, 40, 50, 60) | 10, 40, 50 and 60 | The slice captures the (20, 30) subset of |
[[ myList = (10, 20, 30) myList[1:2] = makeList(25) ]] | (10, 25, 30) | 10, 25 and 30 | The slice captures the (20) subset of |
Important
The last example uses makeList to define the new list. This is required for single-value lists.
Adding list values
ATL in Script | Resulting List | Printed Result | Notes |
|---|---|---|---|
[[ myList = (1, 2, 3) myList[3: ] = (4, 5, 6) ]] | (1, 2, 3, 4, 5, 6) | 1, 2, 3, 4, 5 and 6 | The slice captures no values in |
[[ myList = (1, 2, 3) myList[0:0] = (4, 5, 6) ]] | (4, 5, 6, 1, 2, 3) | 4, 5, 6, 1, 2 and 3 | The slice captures no values in |
[[ myList = (1, 2, 3) myList[1:1] = makeList(5) ]] | (1, 5, 2, 3) | 1, 5, 2 and 3 | The slice captures no values in |
Deleting list values
ATL in Script | Resulting List | Printed Result | Notes |
|---|---|---|---|
[[ myList = (10, 20, 30) myList[1:2] = makeList() ]] | (10, 30) | 10 and 30 | The slice captures the (20) subset of |
Here is a more complex example for deleting a value from a list:
ATL in Script | Printed Result |
|---|---|
[[

theBeatles = ('John', 'Paul', 'George', 'Pete', 'Ringo')

nameToDelete = 'Pete'

position = indexOf(theBeatles, nameToDelete)

theBeatles[position : position + 1] = makeList()

]] | John, Paul, George and Ringo |
The third line uses the indexOf function to find the positional index for the to-delete item. Also, the final line uses variables (rather than integer values) to define the start and end indexes for the slice.
String slicing
You can use the syntax for slicing on a string to reference a substring.
When slicing a string, treat each character as an individual element. This includes blank spaces. For example, this image shows a breakdown of the string '23 June 1912' using zero-based indexing:
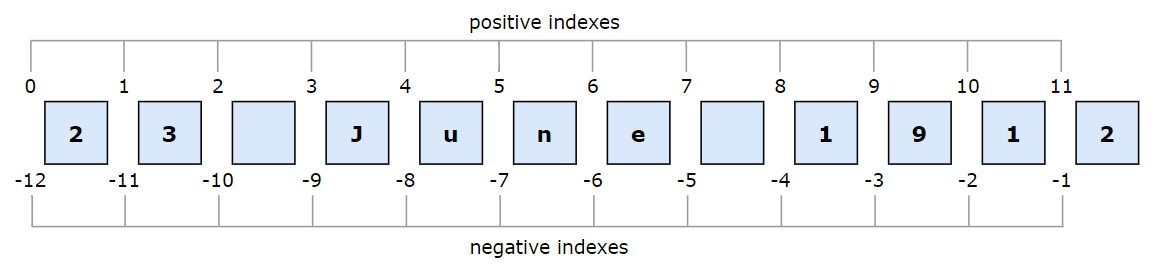
Each character — i.e. each position in the sequence — has two indexes, one positive and one negative. Use this indexing system to define start and end indexes for your slice. For example:
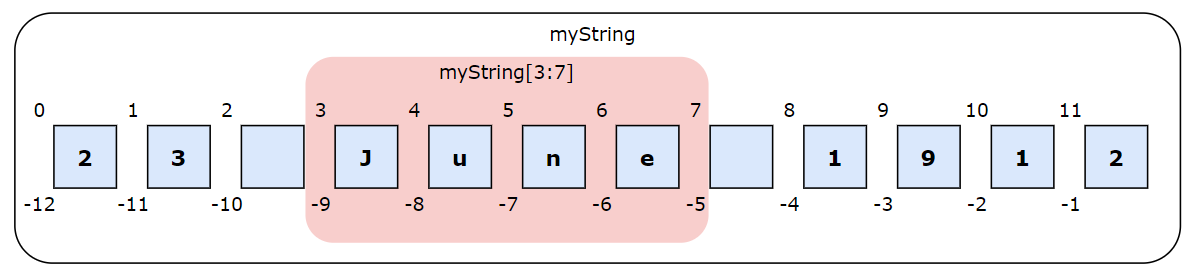
The ATL [[myString]] returns the whole string. The ATL [[myString[3:7]]] returns the substring 'June'. Remember, the end index is exclusive, so the eighth character (at Index 7) is excluded.
Also, remember that every string character has two indexes, one positive and one negative. Therefore, the ATL [[myString[-9:-5]]] returns the same slice as [[myString[3:7]]]. You can mix positive and negative indexes — e.g. [[myString[3:-5]] or [[myString(-9:7)]].
Replacing a substring
The syntax for slice assignment works on lists only, so you cannot assign values to a string slice.
To replace a specific subset of the string, use slicing with the substitute function:
ATL in Script | Printed Result |
|---|---|
[[ myString = '23 June 1912' substitute(myString, myString[ :2], '7') ]] | 7 June 1912 |
[[ myString = '23 June 1912' substitute(myString, myString[3:7], 'August') ]] | 23 August 1912 |
[[ myString = '23 June 1912' substitute(myString, myString[-4: ], '2021') ]] | 23 June 2021 |
Alternatively, use slicing with the joinStrings function:
ATL in Script | Printed Result |
|---|---|
[[

myString = '23 June 1912'

joinStrings('7', myString[2: ])

]] | 7 June 1912 |
[[ myString = '23 June 1912' joinStrings(myString[0:3], 'August', myString[-5: ]) ]] | 23 August 1912 |
[[ myString = '23 June 1912' joinStrings(myString[0:8], '2021') ]] | 23 June 2021 |
Strictly speaking, this joinStrings method does not replace a subset of the input string; rather, it constructs a new string by concatenating string slices with a string of replacement text.
Array slicing
You can use the syntax for slicing on an array to reference a subarray.
For array slicing, treat each object within the array as an individual element:
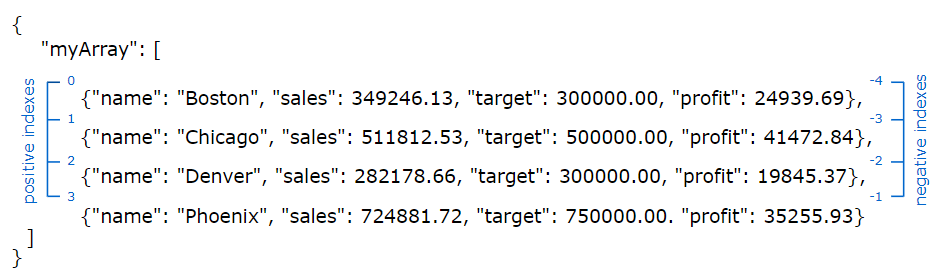
This array contains four JSON objects, and each object contains four key–value pairs. Each object has two indexes, one positive and one negative. Use these start and end indexes to slice the array. For example:
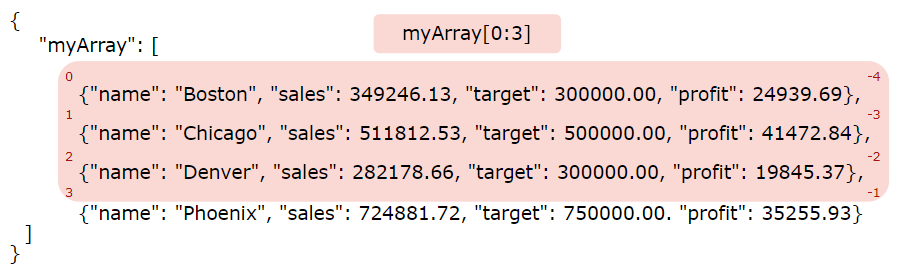
The ATL [[WholeJSON.myArray]] returns the whole array. The ATL [[WholeJSON.myArray[0:3]]] returns the first three objects in the array. Remember, the end index is exclusive, so the final object (Index 3) is excluded.
Each object in the array has two indexes, one positive and one negative. Therefore, the ATL [[WholeJSON.myArray[0:3]]] returns the same slice as [[WholeJSON.myArray[-4,-1]]]. You can mix positive and negative indexes — e.g. [[WholeJSON.myArray[0:-1]]].
Tip
The syntax for slice assignment works on lists only, meaning you cannot assign values to an array slice. To replace elements in an array (e.g. to replace values in an array of numbers), first convert the array to a list using asList.
