Data View
The Data view shows the sample data uploaded to your Studio project. How you access that data depends on the file type (CSV or JSON) and the project type. The Data view allows you import new sample data, export the existing data, and even make in-tool edits to the data.
Index
Importing and exporting data
Importing data when starting a new project
Once you have chosen the type of project and given the project a name, you land in the Data view and are asked to import a file containing the data you want to work with.
To import the data file into your project, drag and drop it into the Drag and Drop area, or click the browse link and select the file using the pop-up navigation window.
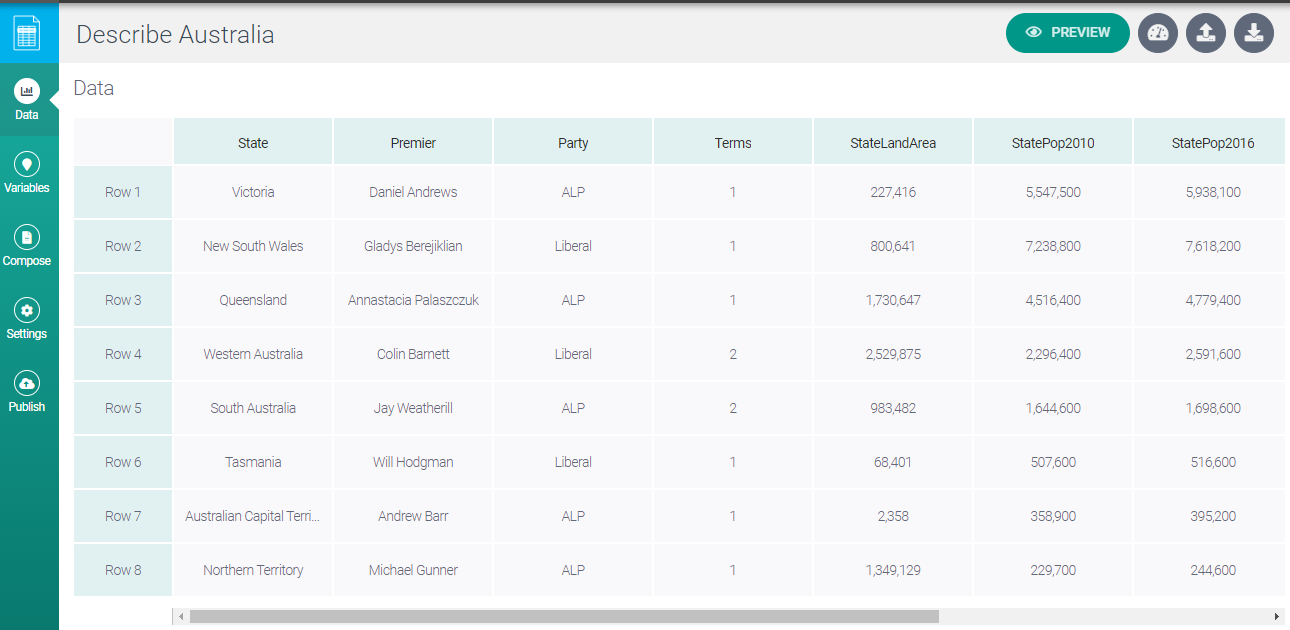
Once your data has been imported and you click Continue, you will see that data in the Data view.
Note
The file size limit when importing sample data is 1 MB. After a project is published, you can run it via the API with larger data files. Currently, the data size limit for calling a project via the API is 20 MB, but we can increase this for private-cloud and customer-hosted deployments — contact Support for assistance.
Importing data after creating a project
To import a new data file once you’ve created a project, click the Import new sample data button, then follow the instructions to browse for, or drag and drop, the new file.

Exporting data
To export your data to a file, click the Export data to file button, then follow the instructions.

Data view for table projects
Column names and variable names
When working with table data, you use variables to reference data values in your table. It’s important to understand the relationship between these variables and the columns you see in the Data view.
Each column in your data corresponds to a variable. Studio automatically creates these variables at the point of data upload. You can find a full list of these variables in the Variables view.
Studio does not impose restrictions on column header names. However, there are rules for what counts as a valid variable name:
It must be not exceed 40 characters in length.
It must begin with an alphabetic character.
It must not contain spaces or punctuation marks other than the underscore character.
It must not be the same as an existing variable name, script name, folder name, or reserved word.
Therefore, if a column header name in your data violates one of these rules, Studio automatically transforms the column header to produce a valid name. This is explained further in Variables > Variable names.
Adding, modifying, or deleting columns
To add, modify or delete columns in your sample data, you must upload a new CSV file.
Suppose you have a table with the column headings State, Leader, StateLandArea, and Capital, and you want to change the Leader heading to Premier. To do this, you must export the data, edit the column heading, then re-import the data. You’ll see the screen shown below with options for the missing Leader column:
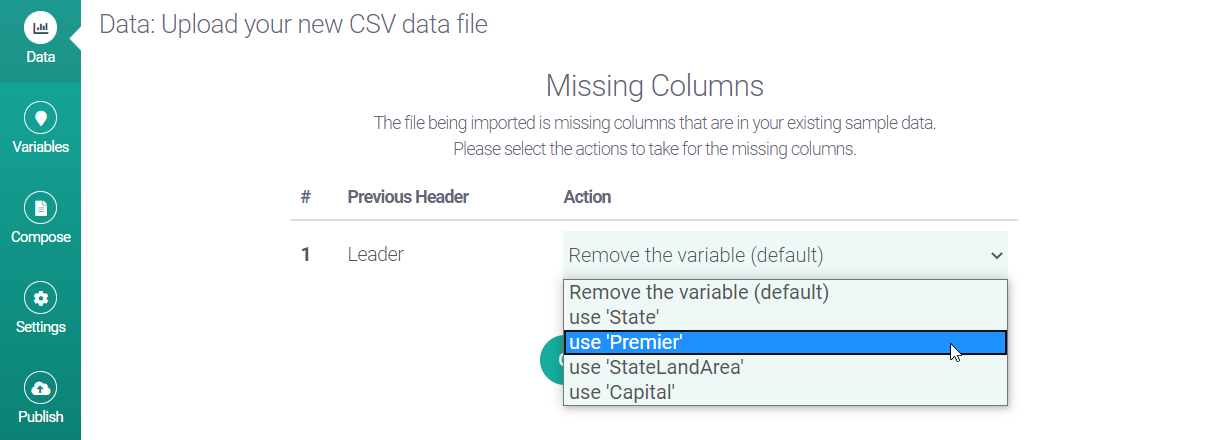
If you click the dropdown arrow, select use 'Premier', and click Continue, Studio updates the table to reflect the new column name. Also, the corresponding new variable — Premier — now appears in the Variables view:
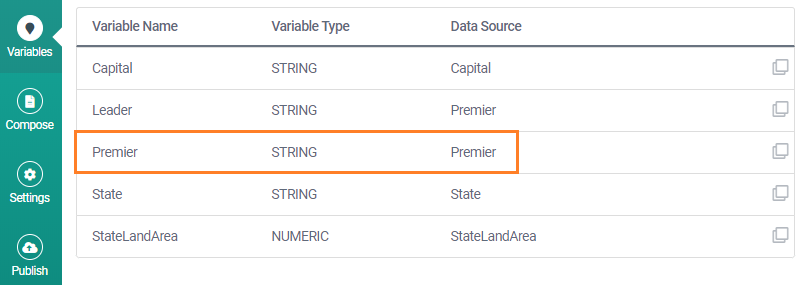
Notice that the old variable — Leader — is still there but is now mapped to the Premier variable. This means that you don't need to amend your script as references to the old Leader variable still work as previously.
If you choose to remove an old variable (the default option) rather than replace it, you may have to update your ATL scripts as any references to removed variables generate errors.
Tip
For more about how data is used in table projects, see Key Concepts > Projects.
Data view for JSON projects
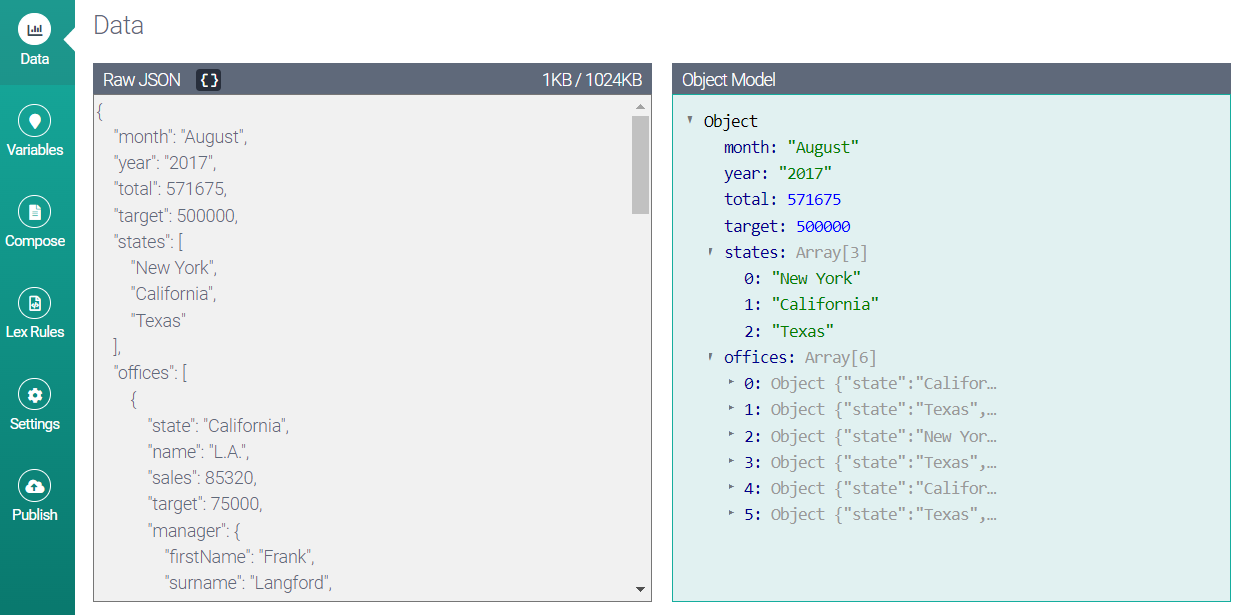
In JSON projects, the Data view is split into two panes:
The left pane displays your data and doubles as an editor in which you can change the data. This is useful while developing because it lets you quickly try different data scenarios.
The right pane shows the same data, but with formatting to help you understand the structure. You can collapse the objects and arrays in the right pane, for a different view of the data.
If you change your data in the editor, Studio automatically reformats the data (in both panes) as soon as you click outside the editor. To manually reformat without clicking outside the editor, click the Format JSON button:

Studio requires all imported JSON data to be wrapped in a root object (an object at the top level). If your data is naturally an array, make that array the value for a key–value pair.
For example, suppose your data was this array:
[
   {"name": "Retine", "sales": 200429, "target": 150000, "COGS": 100000},
   {"name": "Ointmo", "sales": 156777, "target": 150000, "COGS": 120000},
   {"name": "Glower", "sales": 234552, "target": 175000, "COGS": 150000}
]
Studio will reject any attempt to upload this data because it requires the input data to be a JSON object. Here is how you could make the data valid for upload to Studio:
{
    "myData": [
        {"name": "Retine", "sales": 200429, "target": 150000, "COGS": 100000},
        {"name": "Ointmo", "sales": 156777, "target": 150000, "COGS": 120000},
        {"name": "Glower", "sales": 234552, "target": 175000, "COGS": 150000}
    ]
}
The data is now a JSON object with one key–value pair. The key is "myData" and the value is the array.
JSON keys should not contain dots or begin with a dollar symbol ($). If the name contains non-alphanumeric characters or begins with a number, you must use bracket notation to access the key.