Troubleshooting
On this page, you will find information about known issues in Studio and how to solve them.
Index
Web browsers
Studio works best in Google Chrome. If you experience any issues and are not using Chrome, switching to Chrome may solve the problem. If you require further assistance, please don't hesitate to contact us at Support.
Web browser extensions
Some extensions may interfere with web applications such as Arria Studio. Please try disabling or uninstalling them if you experience problems. We are aware that the following extension causes problems:
Grammarly
ZoomInfo
Cannot import CSV data
Studio will not import a CSV data file containing rows or columns with duplicate names.
A file with duplicate column names will always be rejected. This is because, in all table project types, Studio automatically creates a column variable for each column, and each column variable requires a unique name.
A file with duplicate row names will be rejected in “Describe the Table” and “Describe Row in Context” projects only. This is because those project types have special built-in data access variables (such as FocusRow and RowNames) that cannot work unless each row has a unique row name.
For more information, see Data access variables in table projects.
Suppose the following table data is stored in CSV format and you attempt to import the file when starting a "Describe the Table" or "Describe Row in Context" project:
Jurisdiction | Type | Capital | StateLandArea | StatePop2010 | StatePop2010 |
|---|---|---|---|---|---|
New South Wales | State | Sydney | 800,641 | 7,238,800 | 7,618,200 |
Victoria | State | Melbourne | 227,416 | 5,547,500 | 5,938,100 |
Queensland | State | Brisbane | 1,730,647 | 4,516,400 | 4,779,400 |
Victoria | State | Hobart | 68,401 | 507,600 | 516,600 |
For these project types, Studio assumes that the first column of a CSV data table contains the row names. This is the Jurisdiction column in the table above. The entries in this column must be unique; however, as you can see, "Victoria" is a duplicate. In addition, two columns have been named StatePop2010.
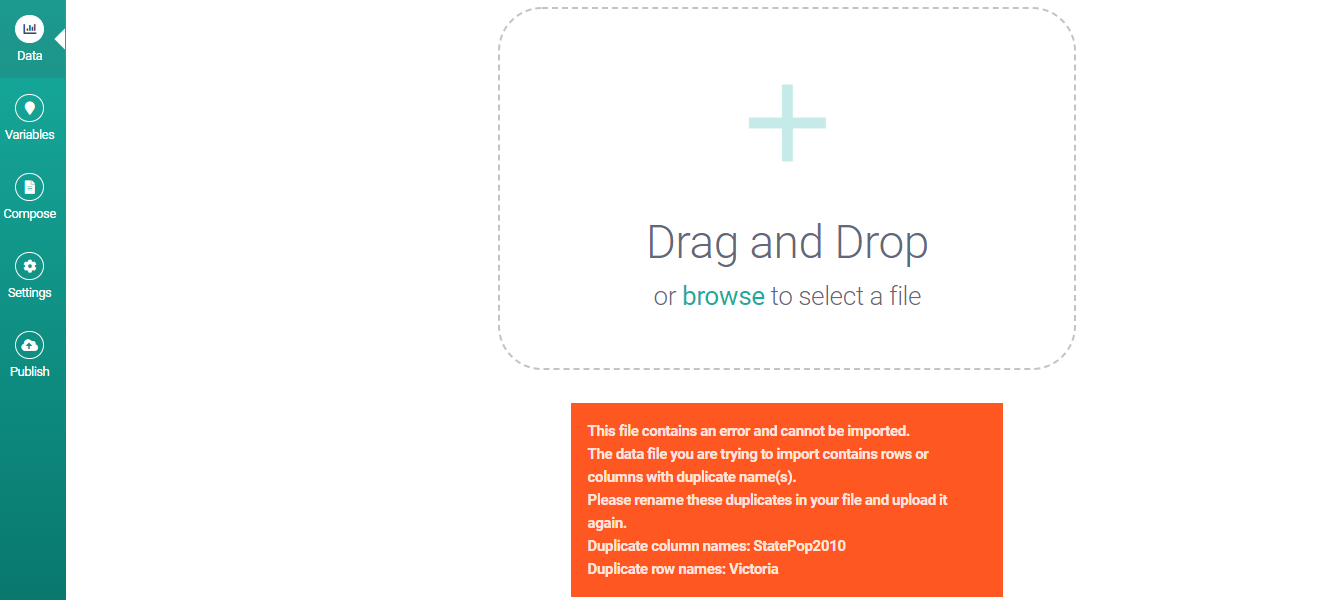
Attempting to import this data for a "Describe the Table" or "Describe Row in Context" project* will produce the following error message:

The fix here is simple: identify and eliminate the duplicates in your data, then import the amended file. As you can see, the error message makes this process easier by listing the duplicate values for you.
* If you attempted to import this data for a "Describe Each Row" project, the error message would identify the column duplicate only. The user cannot make use of row names in this project type; therefore, duplicate row names (i.e. duplicates in the first column of data) are permissible.
Note
If "null" is listed among the duplicates in the error message and there are no empty cells in your data, try deleting some unused rows or columns around the data (e.g. a few rows beneath the final row) and then import the amended data file. Alternatively, copy and paste your data into a new CSV file, taking care not to copy any extra empty rows or columns, and import that file instead.
Cannot import JSON data (JSON array as root object)
Studio requires all imported data to be a JSON object (at the root level). If your data is naturally an array, you must place it inside an object — that is, inside a key–value pair surrounded by curly brackets.
For example, the following is valid JSON but is invalid data:
[
    {
        "employee": {
            "firstName": "Lokesh",
            "lastName": "Gupta",
            "cars": [
                "Ford",
                "BMW",
                "Fiat"
            ]
        }
    },
    {
        "employee": {
            "firstName": "Brian",
            "lastName": "Schultz",
            "cars": [
                "Tesla",
                "Kia"
            ]
        }
    }
]
Here the array is not inside an object. Attempting to upload this data file produces the following error message:
The file contains an error and cannot be imported. It contains a JSON array as root object
A fixed version of the data is shown below:
{"myData" :[
    {
        "employee": {
            "firstName": "Lokesh",
            "lastName": "Gupta",
            "cars": [
                "Ford",
                "BMW",
                "Fiat"
            ]
        }
    },
    {
        "employee": {
            "firstName": "Brian",
            "lastName": "Schultz",
            "cars": [
                "Tesla",
                "Kia"
            ]
        }
    }
]}
No ‘Access-Control-Allow-Origin’ header is present on the requested resource
If you get an error that looks like the following:
Failed to load
https://app.studio.arria.com/...:
No 'Access-Control-Allow-Origin' header is present on the requested resource.
Origin 'https://www.mydomain.com' is therefore not allowed access.
The response had HTTP status code 400.
You need to add the domain address in the origin line (e.g. https://www.mydomain.com) to the CORS list under API in the Publish tab. Also note that additions to the CORS list only take effect once you have re-published the project, so after adding your domain, please try pressing the Publish button again to re-publish the latest version of the project. The URL and key will not change when you re-publish so you shouldn’t need to make any other changes to the way you are calling the API.
API call returns results based on the sample data, not the data I sent
If you are successfully calling the API endpoint for your project, and you are sending it new data but getting back results based on the sample data, then please check that you have correctly converted your data to the POST request body format. For guidance see Using a Studio app's API > The request body.
Even for a JSON project, you will need to add the following JSON at the beginning of your JSON data file and terminate it correspondingly.
{ "data":[ { "id":"Primary", "type":"json", "jsonData": … … } ]}
Some characters showing as ‘?’ or odd symbols
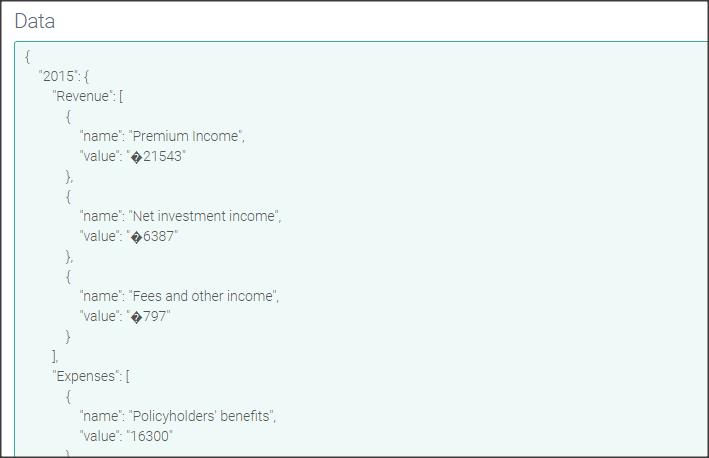
If you upload a lex rule file or sample data file into your project and it shows odd symbols or question marks instead of certain symbols like £, €, é or ¥, as below, then this is probably because the file used a different encoding to UTF-8, which is generally used by Studio.
 |
To fix this you need to convert the encoding of your lex rule or data file to UTF-8, then re-upload it.
For example, if you open your file in Notepad++ on Windows, the encoding is shown in the bottom bar, in the right half. (In the example, the encoding is ANSI.)
 |
Choose the menu option Encoding > Convert to UTF-8 to convert the file, then save it. Then re-upload the file and you should see the characters correctly.
For classic Windows Notepad select File > Save As, then select ANSI from the Encoding dropdown menu at the bottom right.
Conditional produces a syntax error
Do not put quotes around strings in the Conditional Builder. If you do, and you build the conditional, it will produce a double-quoted string in ATL. Suppose you were to type the quoted string ‘Labour’ in the Conditional Builder, and the ATL it produced was: [[if(Party==''Labour''){yes}else{no}]].
If you called this, it would produce the following error:
Syntax Error
There are syntax errors in the Script 'Main' that need to be fixed before the project can be run:
Syntax error near '''Labour': Premature 'Labour'. Please add a closing ')' or continue the boolean expression.
Syntax error near 'Labour'': Unexpected token '''. Expected completion of the statement.
Syntax error near ''')': Unexpected token ')'. Expected completion of the statement.
which can be confusing if you don’t know what caused it!
The solution is simple. With no quotes, the Conditional Builder produces [[if(Party=='Labour'){yes}else{no}]] which runs without an error (provided, of course, that your project has a variable called Party).
Inserting links from a data table column
The Insert Link button in Compose View makes it easy to insert a hard-coded link to a web page in your script. As well as hard-coded links, you can insert links from your input data.
For example, imagine a "Describe Each Row" project with the following table data:
Row No. | SearchEngine | URL |
|---|---|---|
Row 1 | https://www.google.com/ | |
Row 2 | Bing | https://www.bing.com/ |
Row 3 | DuckDuckGo | https://duckduckgo.com/ |
Just calling the URL column variable directly in your script will not work; the output for each row would produce the URL in plain text, not as a clickable link. Similarly, creating a link using the Insert Link button and giving it the column variable also will not work.
For example, the ATL The home page for [[SearchEngine]] is [[URL]] produces the following output for Row 1:

To produce the URL as a clickable link, you must create an HTML link using the <a> tag and the URL column variable. Then you must apply the decodeHtml function (see decodeHtml) to that expression to ensure Studio interprets the strings in the URL column as HTML.
For example, the ATL The home page for [[SearchEngine]] is [[decodeHtml("<a href='[[URL]]'>[[URL]]</a>")]] produces the following output for Row 1:

As you can see, the URL is now produced as a clickable link.
Important
For the above steps to work, the links in your data table must be full URLs starting with either http:// or https://.
Unwanted gaps in text output
Occasionally, you might find unwanted gaps (whitespace) when you preview the Main script of your project. This typically occurs when a subscript in your project includes unnecessary <p> or <br> tags at the end of its code. These tags are invisible in the editor's Marked Up View and ATL View, but they can be seen in Code View.
Example
The screenshot below shows a project's Main script in the Marked Up view.

As you can see, the second and third paragraphs are calls to the LargestState and SmallestState subscripts.
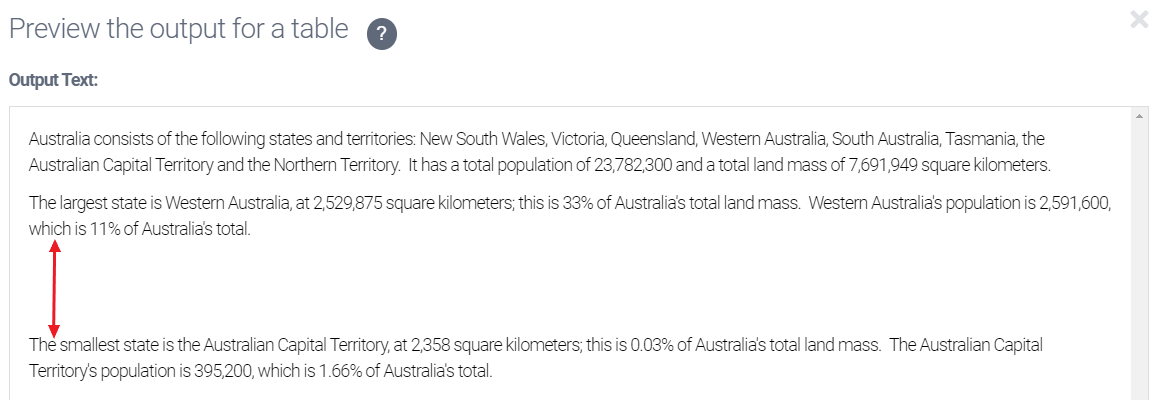
The preview for this Main script shows an unwanted gap (whitespace) between the second and third paragraphs:

Although the gap appears to be in the Main script, the cause of the gap is actually in the LargestState subscript.
Important
The location of unnecessary <p> and <br> tags is not always obvious. For example, the unnecessary tags might be in a subscript that's called within another subscript. When attempting to remove unwanted gaps, it is good practice to carefully investigate each subscript in your project.
The screenshot below shows the LargestState subscript in Code View.

Notice the unnecessary <p> and <br> tags at the end of the code (underlined in red). These cause extra space to be inserted at the end of the subscript. This extra space is then replicated when the LargestState subscript is called in Main. Therefore, these tags must be deleted.
The code for the LargestState script looks like this after deleting the unnecessary tags:

Important
A </p> tag is required to close out the paragraph. Be careful when deleting to make sure that a single </p> tag remains. This is circled in red in the screenshot above.
Now return to the Main script and click Preview. The unwanted gap has been removed.

Inserting a non-breaking space
On occasion, you might want to insert a non-breaking space between two entities in your script. This ensures that a line break will not occur between them when the output text wraps.
The following example was produced in a "Describe Each Row" project using this data:
Row ID | Name | Launch | Length | Beam | Tonnage | MaxCapacity |
|---|---|---|---|---|---|---|
Row 1 | The Arria Spirit | May 2012 | 362.5 | 60.5 | 168,620 | 6,554 |
The following ATL:
[[Name]], launched in [[Launch]], is one of the world's largest passenger ships. It has a length of [[Length]] m, a width of [[Beam]] m, and a tonnage of [[Tonnage]] gt. Its maximum passenger capacity is [[MaxCapacity]] persons.
produces the following text output for Row 1:

As you can see, the text has wrapped between "168,620" and "gt". It would be better to keep the figure and unit together on the same line. To do this, you must create a user-defined variable using the decodeHtml function.
Click Variables to open the Variables view, then click on ADD NEW VARIABLE and create a variable using the following details:
VARIABLE NAME | VARIABLE TYPE | DATA SOURCE |
|---|---|---|
NBSP | STRING |
|
Now insert the NBSP variable between the two entities you want to keep together:
[[Name]], launched in [[Launch]], is one of the world's largest passenger ships. It has a length of [[Length]] m, a width of [[Beam]] m, and a tonnage of [[Tonnage]][[NBSP]]gt. Its maximum passenger capacity is [[MaxCapacity]] persons.
Important
There should be no spaces between your user-defined variable and the two entities you want to keep together.
Now click Preview to see your text output. The "168,620" amount and the "gt" unit text are now on the same line:

"®" changing to registered symbol ®
When you enter "®" in your ATL script, Studio will automatically convert it to the registered trademark symbol ®. This effect can be unintended — for example, when your script includes a complex conditional including an AND (&&) and a column variable name starting with "reg" (such as "region").
The following example was produced in a "Describe Each Row" project using this data
Row ID | region | sales | profit |
|---|---|---|---|
Row 1 | North | 10,054.98 | 2,542.67 |
The following complex conditional could be applied to this data:
[[if(sales>10000&®ion=='North'){The North region has exceeded its sales target}else{The North region has not met its sale target}]].
Although this ATL is correct, Studio will automatically convert it to the following:
[[if(sales>10000&®ion=='North'){The North region has exceeded its sales target}else{The North region has not met its sales target}]].
This converted ATL will produce several syntax error messages when you preview your script.
There are two solutions to this problem:
Add one space on either side of the '&&' in your complex conditional. For example, the following ATL will not produce an error:
[[if(sales > 10000 && region == 'North'){The North region has exceeded its sales target}else{The North region has not met its sales target}]].Rename the variable so it no longer begins with "reg". In the example above, changing the column variable name from "region" to "Region" would work, provided the same name change was made in the ATL. For example:
[[if(sales>10000&&Region=='North'){The North region has exceeded its sales target}else{The North region has not met its sales target}]].
Studio Runner: Uploading CSV data produces error about headers not matching
When you upload a new CSV data file using Studio Runner, the following error may appear:
The headers of the Primary data set do not match the headers of the corresponding data set in your project. Expected TEST1. Actual: TEST1. Column Number:1.
It's likely that you will find this error to be unexpected as the column names appear to be the same. That is, they both appear to be TEST1.
This error commonly occurs when the data file used with Studio Runner is saved from Microsoft Excel as type CSV UTF-8 (Comma delimited):

Choosing this save option saves the file in Excel with UTF-8-BOM encoding, rather than UTF-8 encoding. CSV files with UTF-8-BOM encoding have an invisible character at the start of the file, and this is what causes the error in Studio Runner.
In the error message above, "TEST1" is the name of the first column — that is, the first value on the first line of the CSV data file. The error says "Expected: TEST1. Actual: TEST1" because Studio Runner expects "TEST1" in the header for Column 1. Due to the presence of the invisible character, the value is not TEST1 but this value preceded by an invisible character, hence the apparently false error message.
To check the encoding, open your CSV data file in a source code editor such as Notepad++. In Notepad++, the encoding type is shown in the bottom right-hand corner of the window. (Other editors may show it somewhere else.)
A file encoded with UTF-8-BOM looks like this:

To save a CSV file from Excel with the correct UTF-8 encoding, choose the option CSV (Comma delimited):

This is the correct CSV format to use for Studio.
Function not supported in legacy projects
Inserting a formatting function might produce this error:
This function is not supported in legacy projects. Change your Legacy Number Formatting setting (see Settings > Number and Currency > Advanced) to 'numberFormat'.
This occurs when your project is in legacy mode. This mode exists to ensure backward compatibility for older projects. More specifically, it ensures that number formatting continues to work as intended in projects published before the release of version 3.1.0. A downside is that legacy projects don't support the formatting functions introduced in version 3.1.0. These are:
To fix this problem, follow these steps:
Click Settings to access the Settings view.
Click Number and Currency and scroll to the bottom of the tab.
Click the arrow beside Advanced to open the advanced settings.

The LEGACY BEHAVIORS setting should be set to legacy.

Click the SET TO DEFAULTS button (below LEGACY BEHAVIORS) and then click CONTINUE.
The LEGACY BEHAVIORS setting should now be set to numberFormat. Using a formatting function should no longer produce the above error message.
Tip
You could achieve the same effect by toggling the LEGACY BEHAVIORS setting to numberFormat; however, we recommend the SET TO DEFAULTS method given above. This resets all Number and Currency settings to their system defaults, i.e. how they are set when you open a new project. For more about number formatting and legacy projects, see Legacy behaviors.