Compose View
The Compose view is where you write and organize the scripts that generate your project's output narrative.
A typical script includes narrative text interspersed with ATL elements — functions, variables, conditionals, etc. — that extract or compute values from your data. The Compose view's script editor makes creating these scripts easy. In addition, it provides many text formatting options as well as different ways of viewing the script content. The full functionality is described below.
The Compose view also includes a script panel that makes it easy to organize your scripts into a clearly labeled folder structure. This is particularly helpful when you create a complex project comprising multiple scripts. This is also described below.
Index
Using the script editor
The script editor is where you write and edit your scripts. The ribbon at the top of the editor provides access to a wide range of features, all of which are described below. All "insert" operations add the chosen element into your script at the current cursor position.
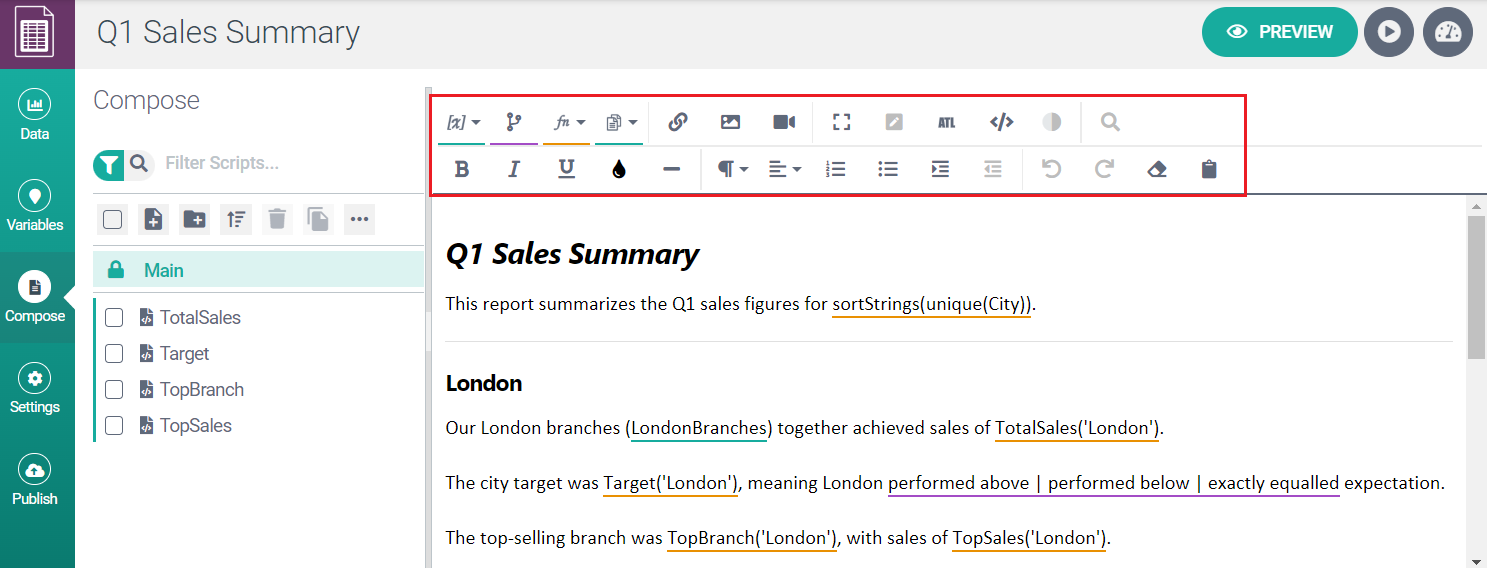
Top row of ribbon
The top-row buttons are described below.

Name | Operation |
|---|---|
Insert Variable | Opens a dropdown menu that allows you to select any variable that exists in the Variables view. The final option in the menu allows you to create a new variable. This new variable will be inserted into the script and automatically added to the Variables view, but you must then provide a data source for the variable before it will work. |
Insert Conditional | Invokes the Conditional Builder, a dialog that helps you to build and then insert conditional statements into your script. See Conditional Builder for further information. |
Insert Function | Opens a dropdown menu from which you can select an ATL function. When you select a function, it invokes the Function Builder to help you specify the function parameters. See Function Builder for further information |
Insert Script | Allows you to insert a call to any script listed in the script panel located on the left side of the screen. The final option in the dropdown menu allows you to create a new script. |
Insert Link | Inserts a link to a web page into your script. (Note: If you want to insert links from a data table cell, see here.) |
Insert Image | Inserts a URL link to an image (e.g. a JPG, PNG, or WebP file) into your script. |
Insert Video | Inserts a URL for a video from a video provider such as YouTube, Vimeo, DailyMotion, or Rutube into your script. If you want to insert a URL link to a video file (e.g. an MP file), use Insert Link instead. |
Fullscreen | Switches to a view that uses all of the space available in the web browser window. The ribbon is still visible, so click the button again to return to the normal view. |
Marked Up View | Switches to Marked Up View. This uses color markup to highlight variables, functions, conditional statements, and script references in your script. It is the default for table projects and an option for JSON projects. |
ATL View | Switches to ATL View. This does not use color markup on key ATL elements (variables, functions, etc.). Instead, it displays the actual ATL. It is the default for JSON projects and is often preferred by experienced Studio users because it allows them to edit the ATL directly rather than use the Function Builder or Conditional Builder. |
Code View | Switches to Code View. This view allows you to see the script’s underlying code. It differs from ATL View in that it shows the underlying HTML formatting as well as the full ATL. Being able to see this representation can help you debug ATL syntax errors and solve formatting issues. |
Change Theme | Allows you to toggle between Light Theme and Dark Theme. This option is available in Code View only. |
Find | Invokes the Find and Replace tool in ATL View. |
Bottom row of ribbon
Most of the bottom-row buttons provide common HTML formatting operations, as indicated by the labels given below. The button's label will also appear in the UI if you hover the cursor over the button.

The formatting is done with HTML markup, which you can see in the editor's Code View.
The four buttons that don't add HTML to your script are:
Name | Operation |
|---|---|
Undo | Undoes the last operation performed on the script content. |
Redo | Redoes the last operation performed on the script content. |
Clear Formatting | Erases all HTML formatting from the selected script content. |
Paste Mode | Allows you to toggle between different paste modes. See here for guidance. |
Formatted Paste Mode or Plain Paste Mode
The editor's default is Formatted Paste Mode. This ensures that content copied from another web page (or another script) retains its HTML formatting when pasted into the editor (Ctrl + V). If you don't want to retain the HTML formatting, switch to Plain Paste Mode. Your choice will be remembered between different editing sessions.
Tip
Not all copied HTML formatting is visible or supported by Studio, so it is generally safer to paste in Plain Paste Mode and then apply any formatting you want in Studio.
To change modes, click the Paste Mode button in the bottom row of the ribbon. The mode is indicated by the color of the button.
Black coloring indicates Formatted Paste Mode.

White coloring indicates Plain Paste Mode.

Tip
To remove all HTML formatting, select the relevant script content and click Clear Formatting (the eraser icon).
Using the script panel
The Compose view includes a script panel where you can see all your scripts, create new ones, and organize them into folders. In addition, you can can delete, rename, and sort the panel content. You can also filter the list of scripts or search for scripts with specific content.
Another useful feature is the ability to copy one or more scripts to a clipboard. You can then paste the copied scripts into a different location within the same project or into another project entirely.
The panel is located to the left of the script editor. Its key features are labeled below:
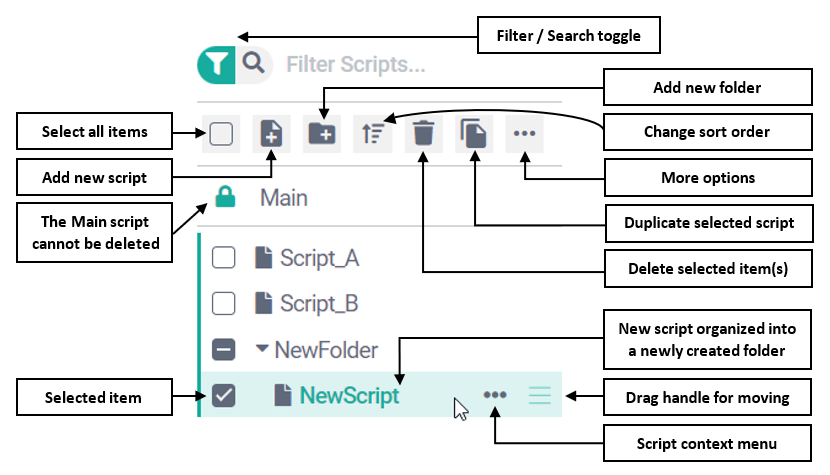
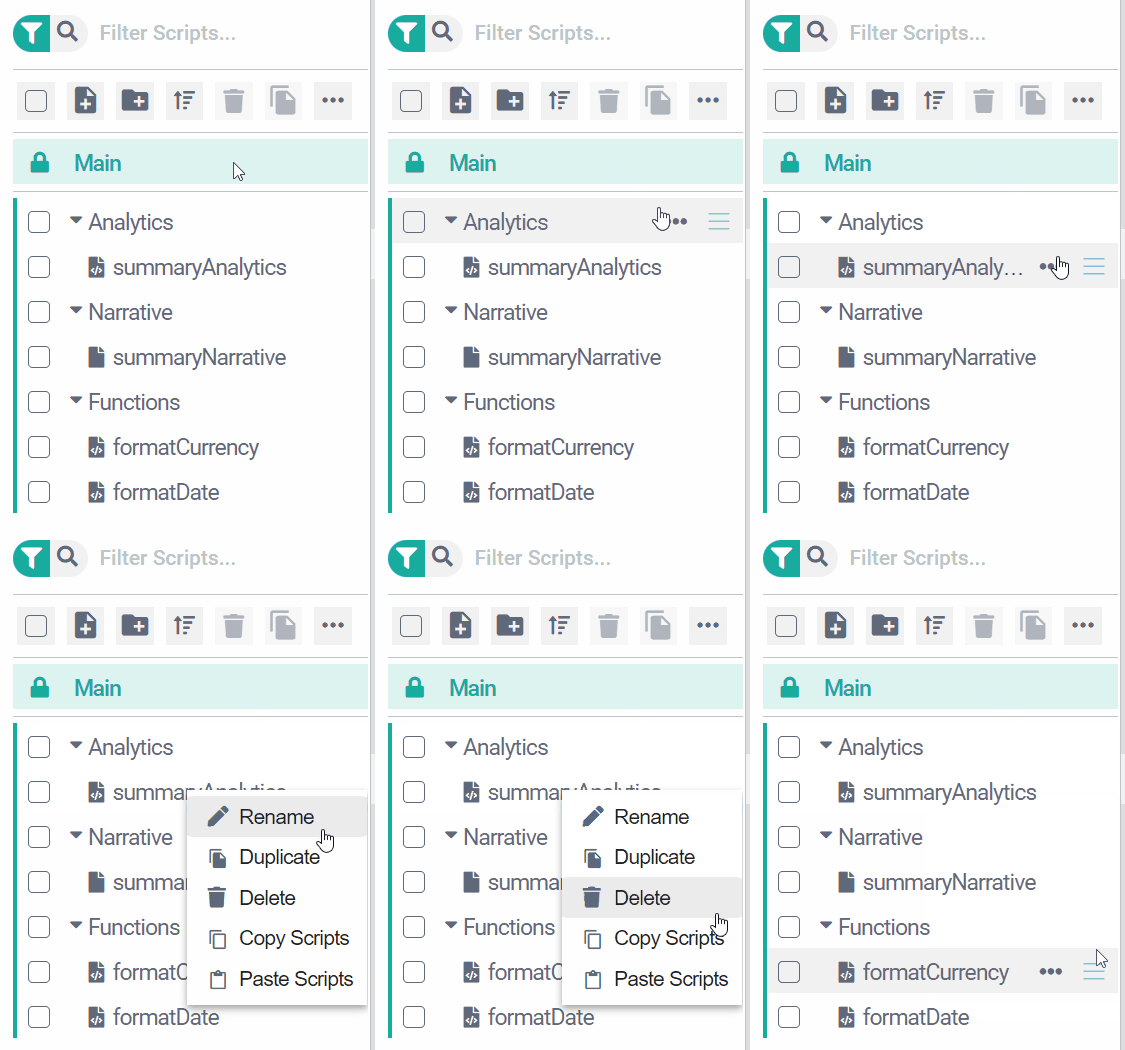
Each script and folder in the panel has its own context menu, from which you can choose options such as Rename, Duplicate, and Delete. You can open the context menu in two ways:
Mouse over the script or folder and click the ellipsis icon (see above).
Right-click the script or folder.
Adding scripts and folders
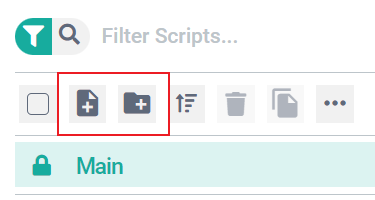
To add a new script or folder to the script panel, click the Add New Script or Add New Folder button.
To create a new item inside an existing folder, go to that folder's context menu and click Add Script or Add Folder.
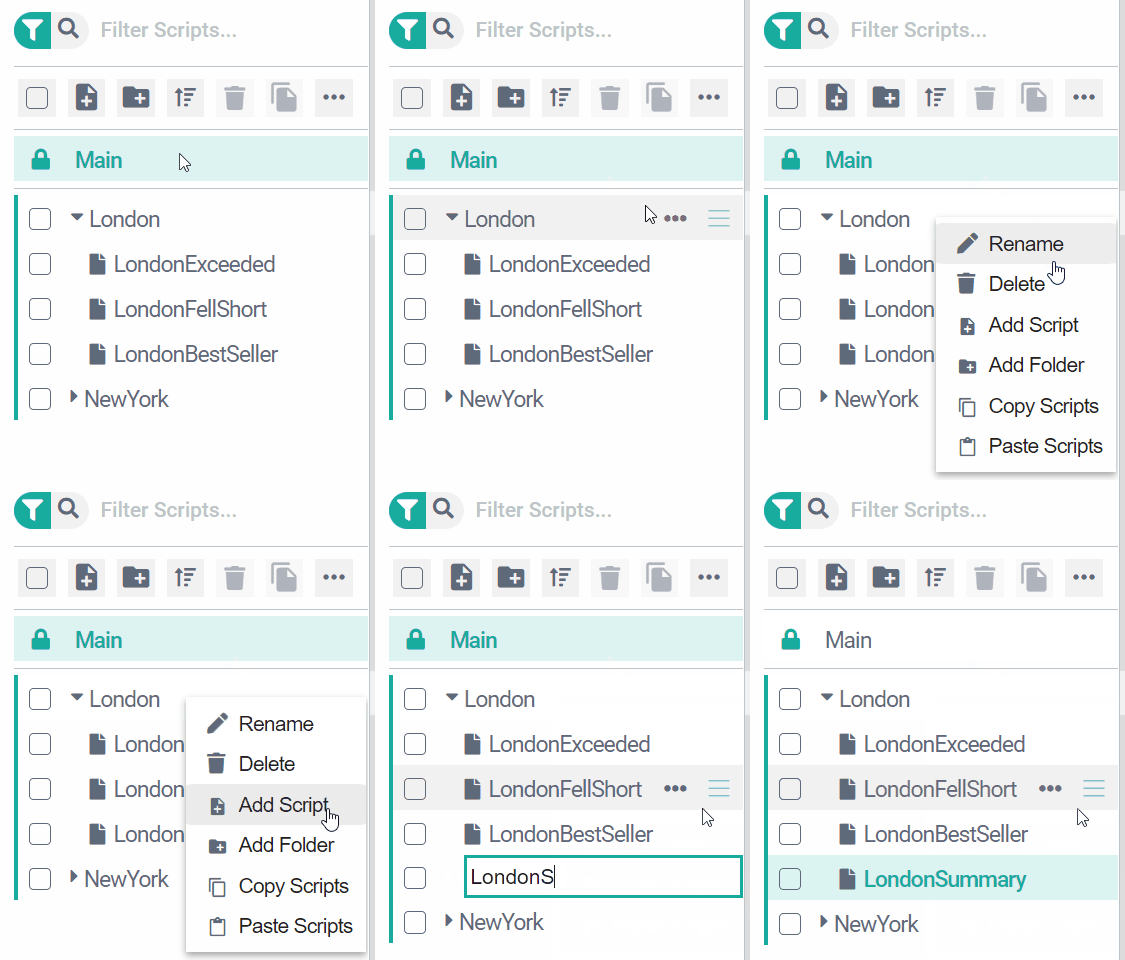
Moving scripts and folders
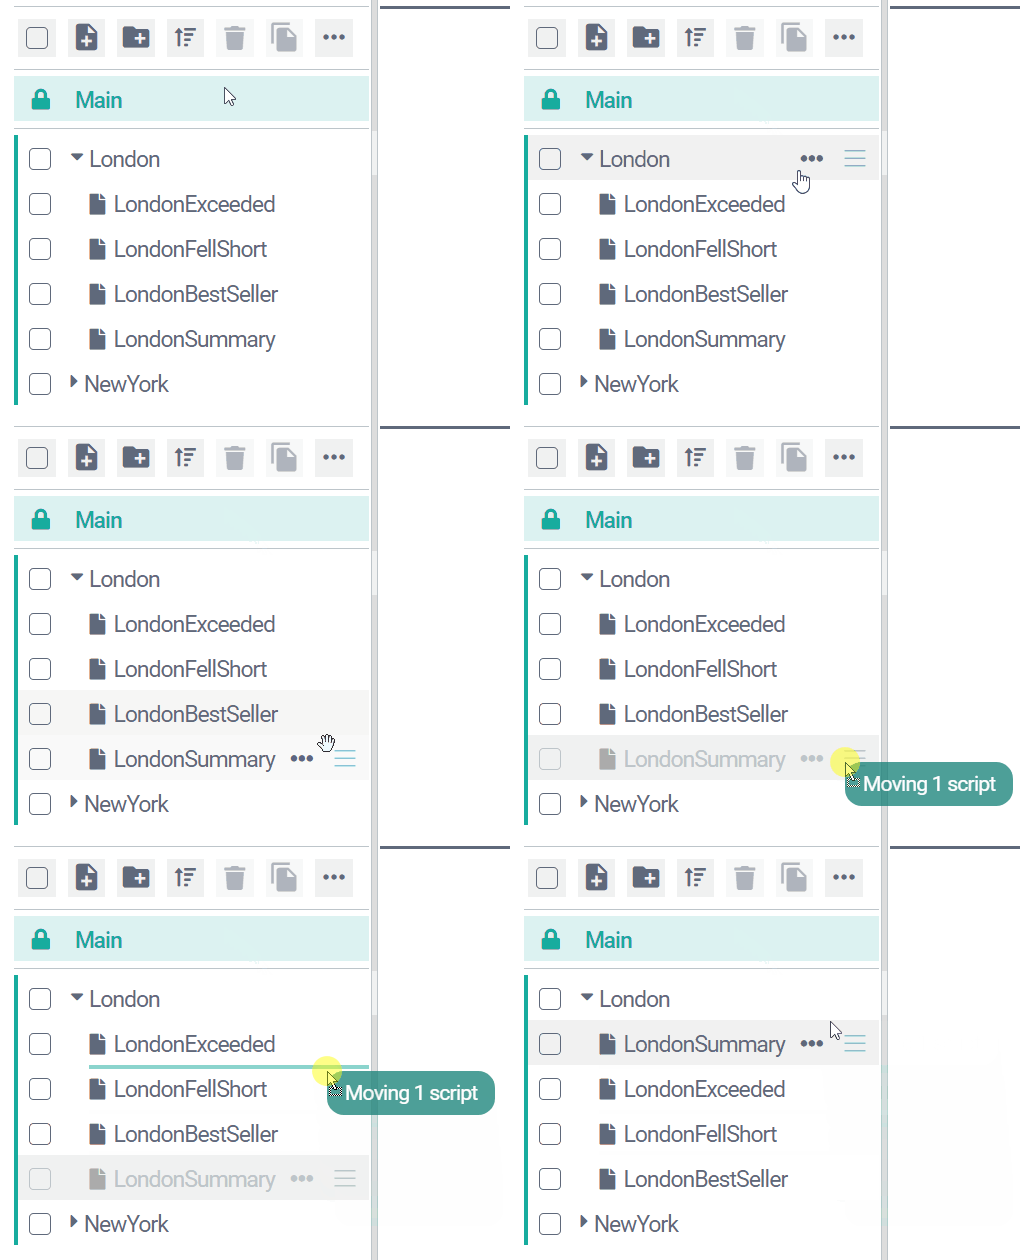
To move a script or folder — either into a folder or into a different position in the list — mouse over the script name and use the drag handle. When the mouse icon changes to a hand, you can click, hold, and drag the script to its new location.
Copying scripts and folders
To copy a single script or folder, go to its context menu and click Copy Scripts.
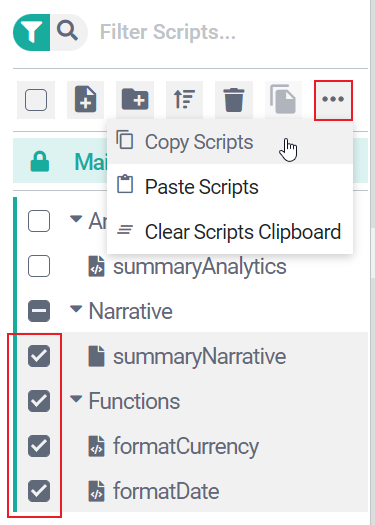
To copy multiple items, select using the checkboxes, click the panel's More Options button, and select Copy Scripts.
Tip
If you select every script in a folder but don't select the folder itself — see the Narrative folder in the image above — only the scripts copy when you click the Copy Scripts option.
Once you have copied to the clipboard, you have two options:
Paste within the same project — e.g. in a different folder.
Paste into an entirely different project.
The GIF below shows how to copy in one project and paste into another using the script panel's More Options button. This method pastes the scripts into the top level of the script panel.
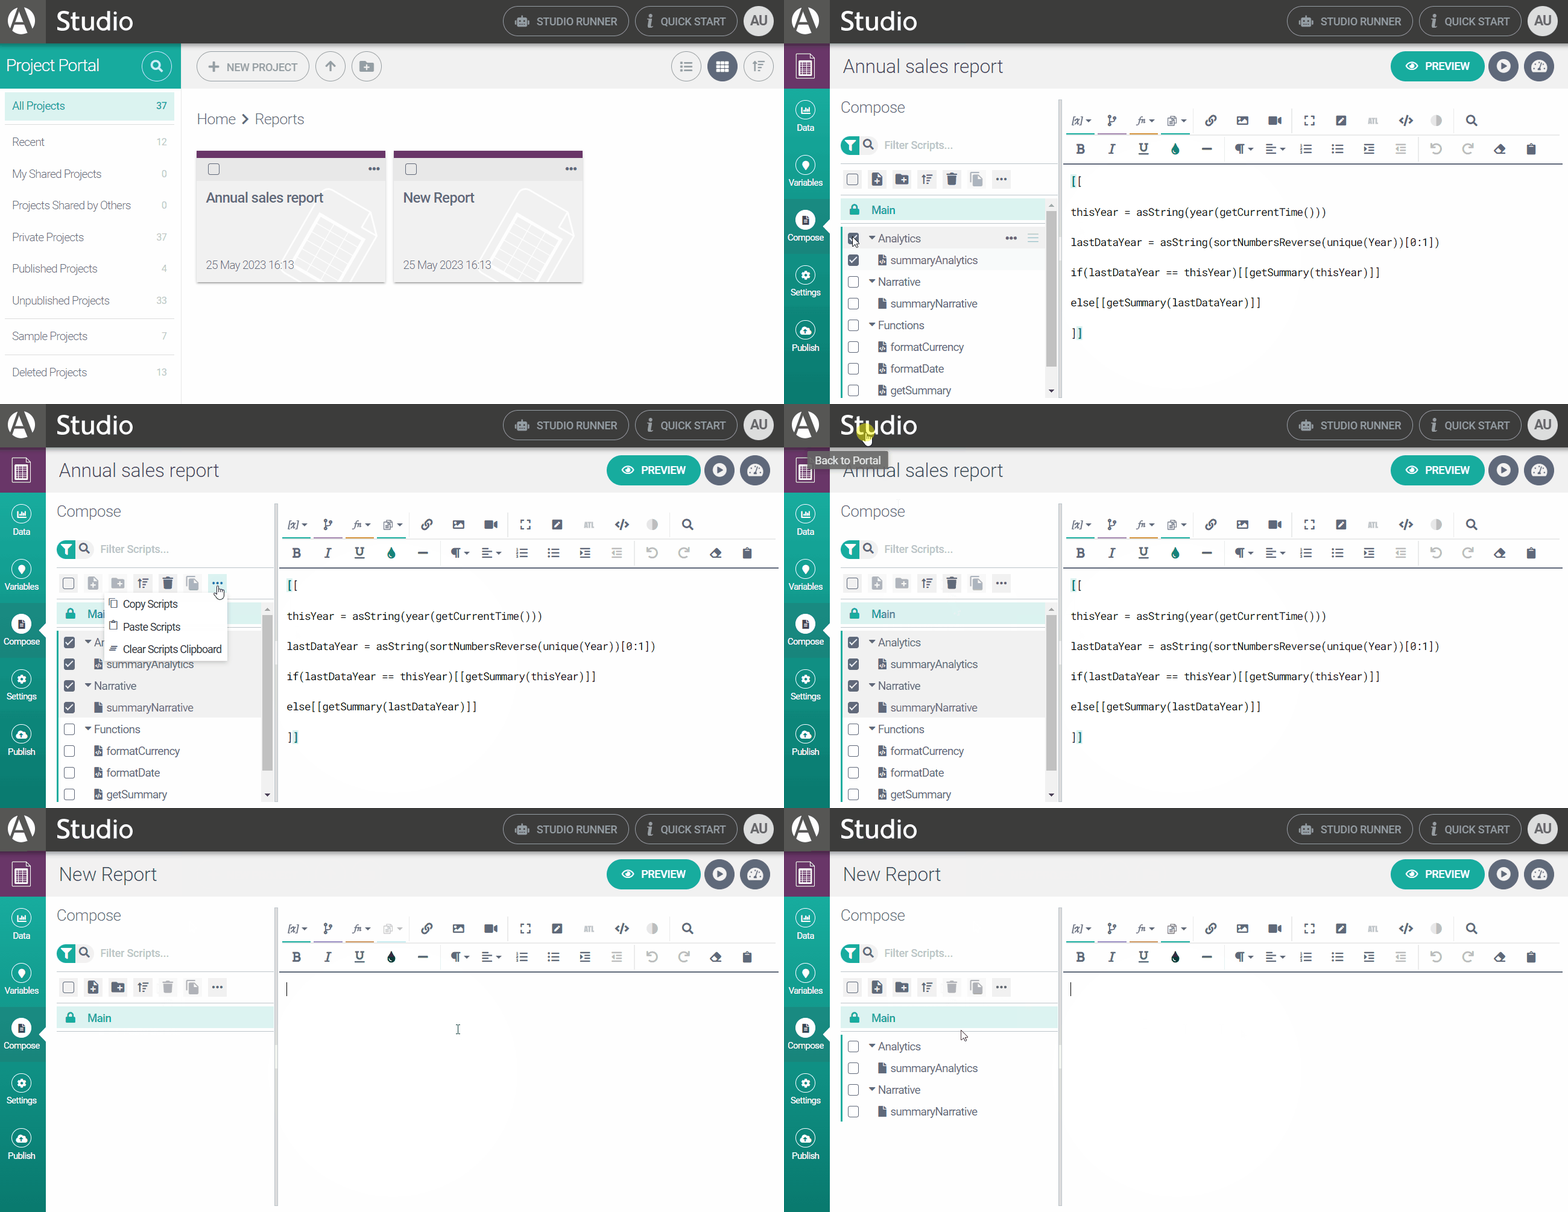
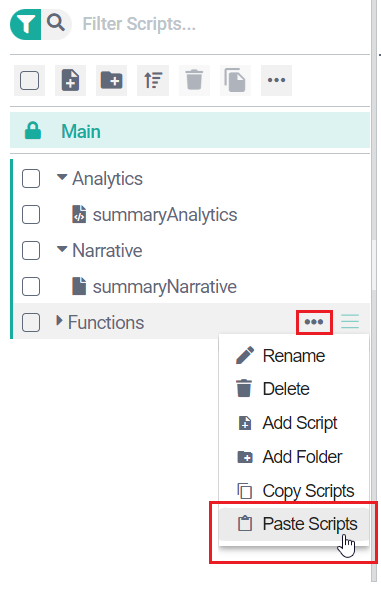
To paste into a specific folder, go to that folder's context menu and select Paste Scripts from there.
Duplicating scripts
To duplicate a script, go to its context menu and click Duplicate.
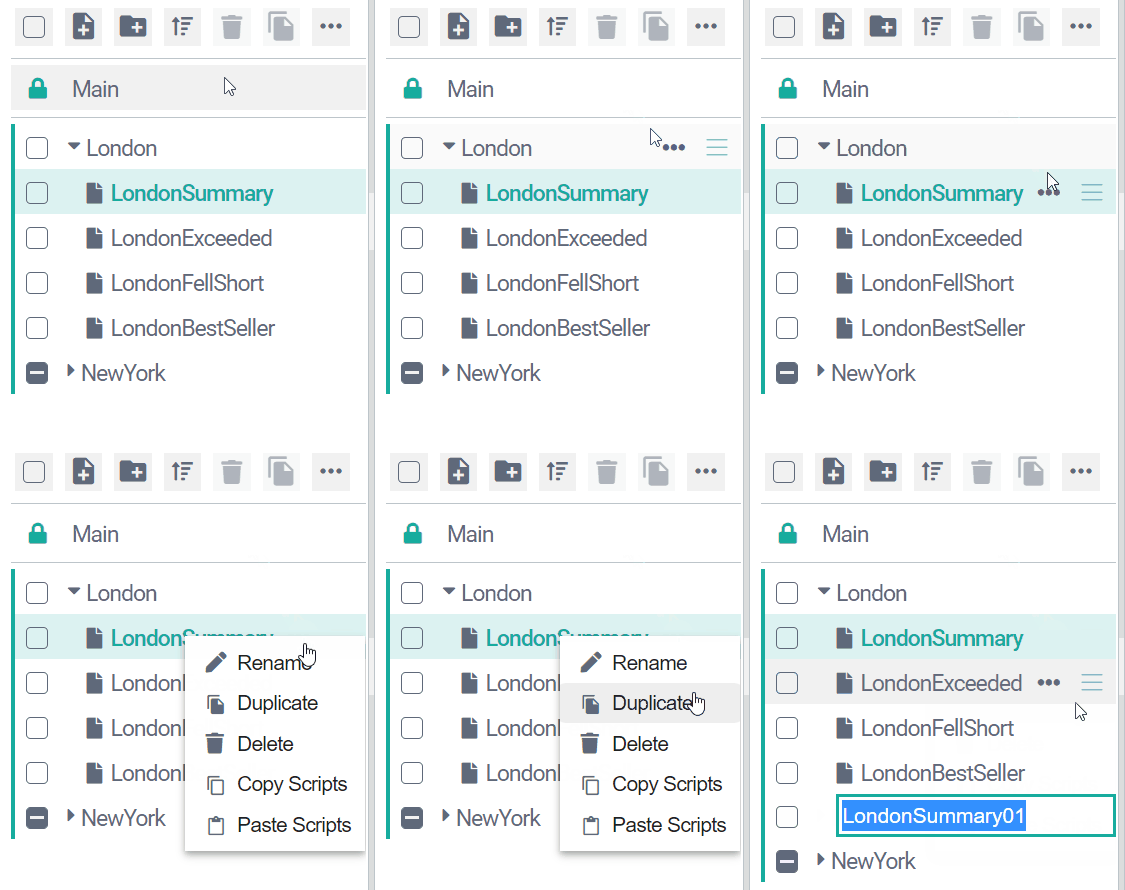
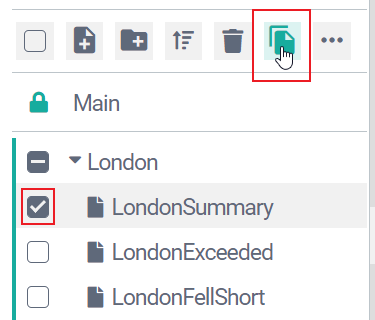
Alternatively, select the script and click the Duplicate Script button.
Note
The Duplicate Script button is available when you have a single script selected. You cannot duplicate a folder, but you can copy-paste multiple scripts/folders — see Copying scripts and folders.
Inserting script calls
You call a script by inserting a reference to that script wherever you want its contents to appear in another script.
To do this, click the Insert Script button and select from the menu. The menu mirrors the folder structure in the script panel.
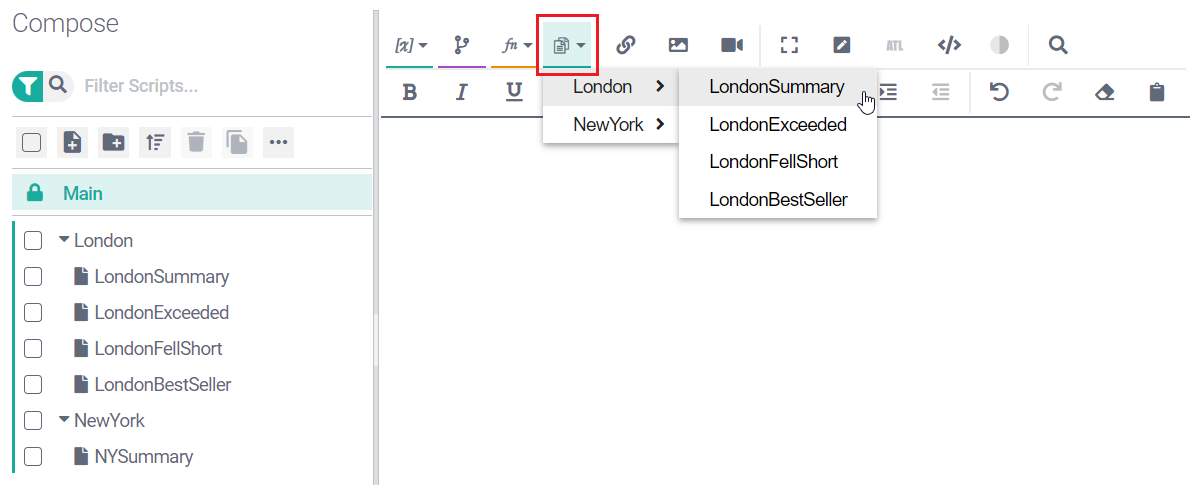
Alternatively, drag and drop from the script panel:
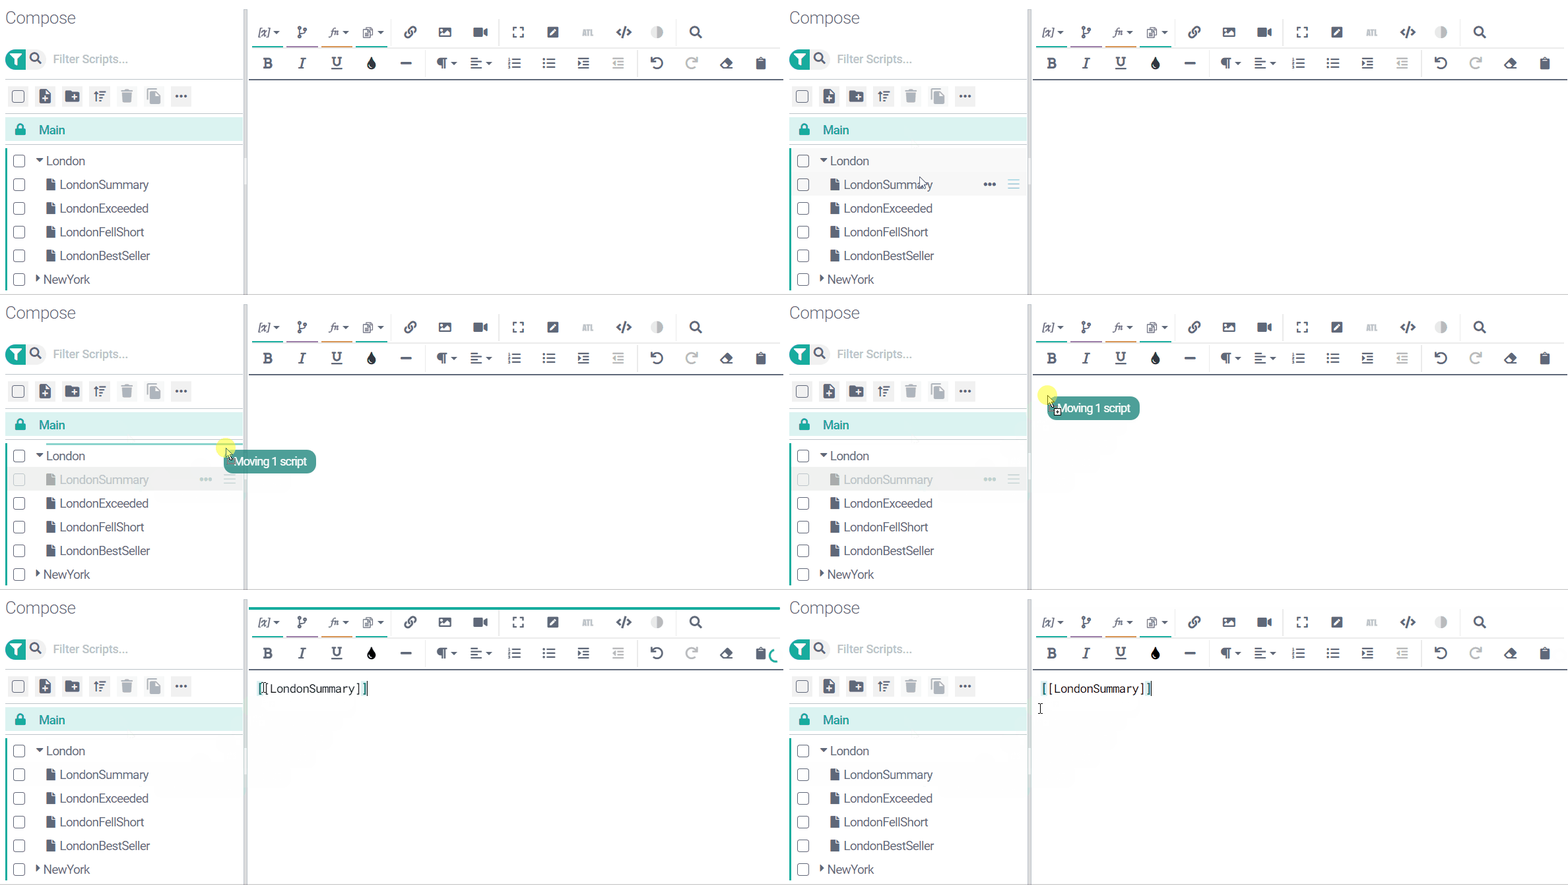
Note
You cannot drag and drop the Main script into another script.
Important
Circular references — e.g. where Script A calls Script B, which then calls Script A again — are not permitted. The editor will allow you to create such a cycle, but you'll get an error message when you attempt to preview the text.
Renaming or deleting scripts and folders
To rename a script or folder, go its context menu and click Rename.
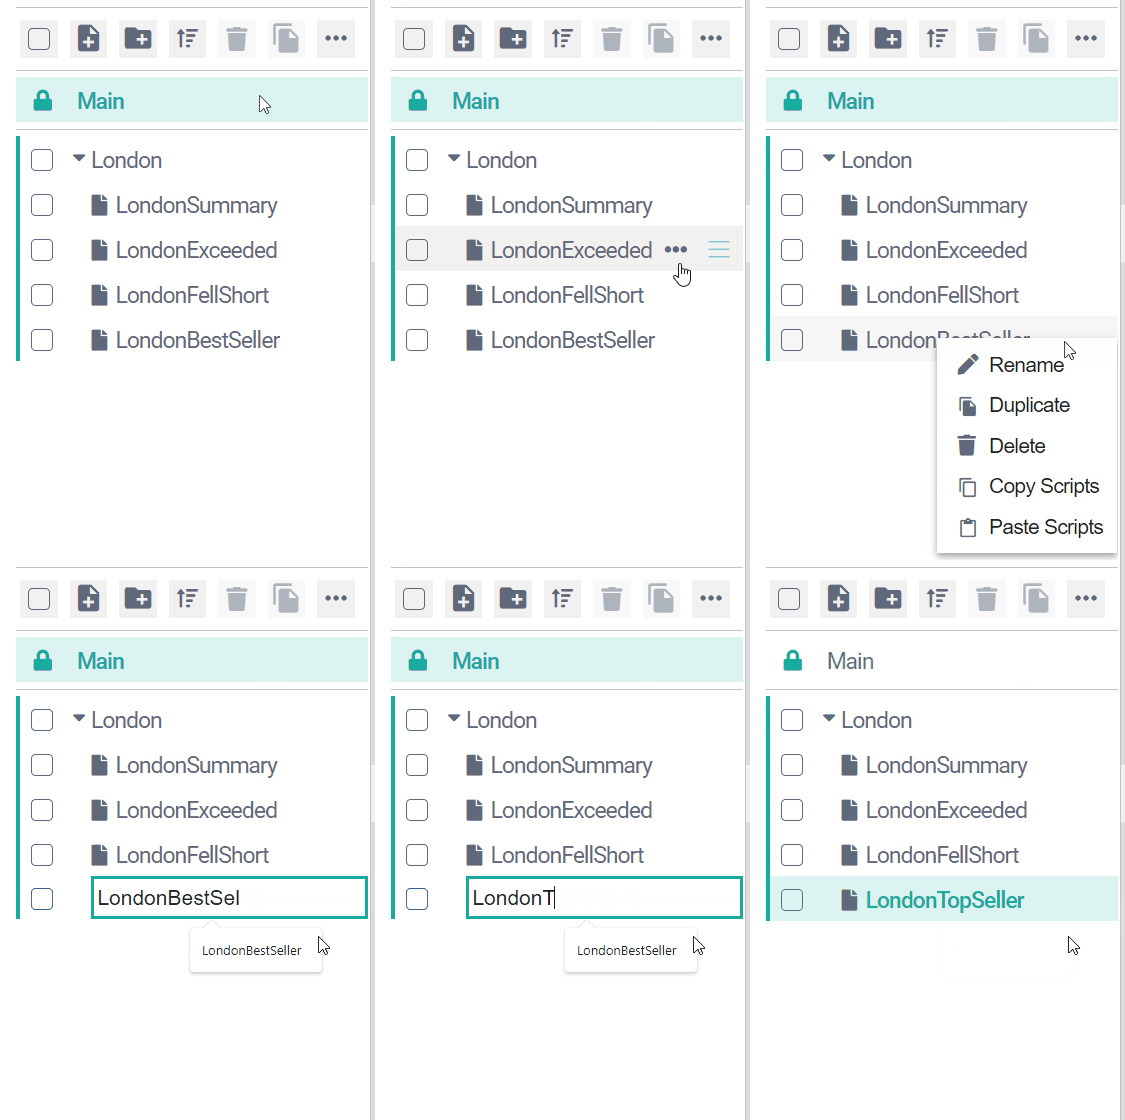
To delete a script or folder, go to its context menu and click Delete. You cannot delete the Main script.
To delete multiple scripts and/or folders, select the relevant items using the checkboxes, and click the Delete button.
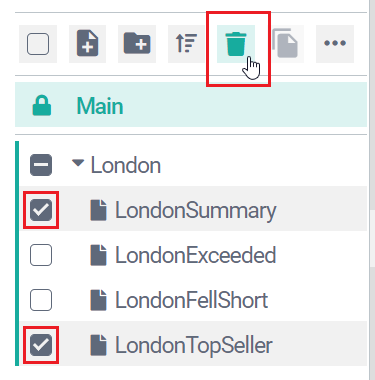
Tip
A Select All Items checkbox is available to the immediate left of the Add New Script button.
Important
Deleted scripts and folders CANNOT be restored; therefore, a pop-up window asks you to confirm the deletion.
Sorting and filtering scripts
To sort your scripts and folders, click the Sort button and select an option from the menu.
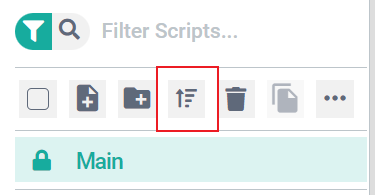
The options are Ascending, Descending, First Created, Last Created, First Modified, Last Modified, and Custom Order.
Note
Custom Order restores the menu to whatever order you created using drag and drop.
To filter the list of scripts by name, toggle the Filter/Search button to Filter and type part of the script name. Only scripts and folders whose name contains the typed text are displayed.
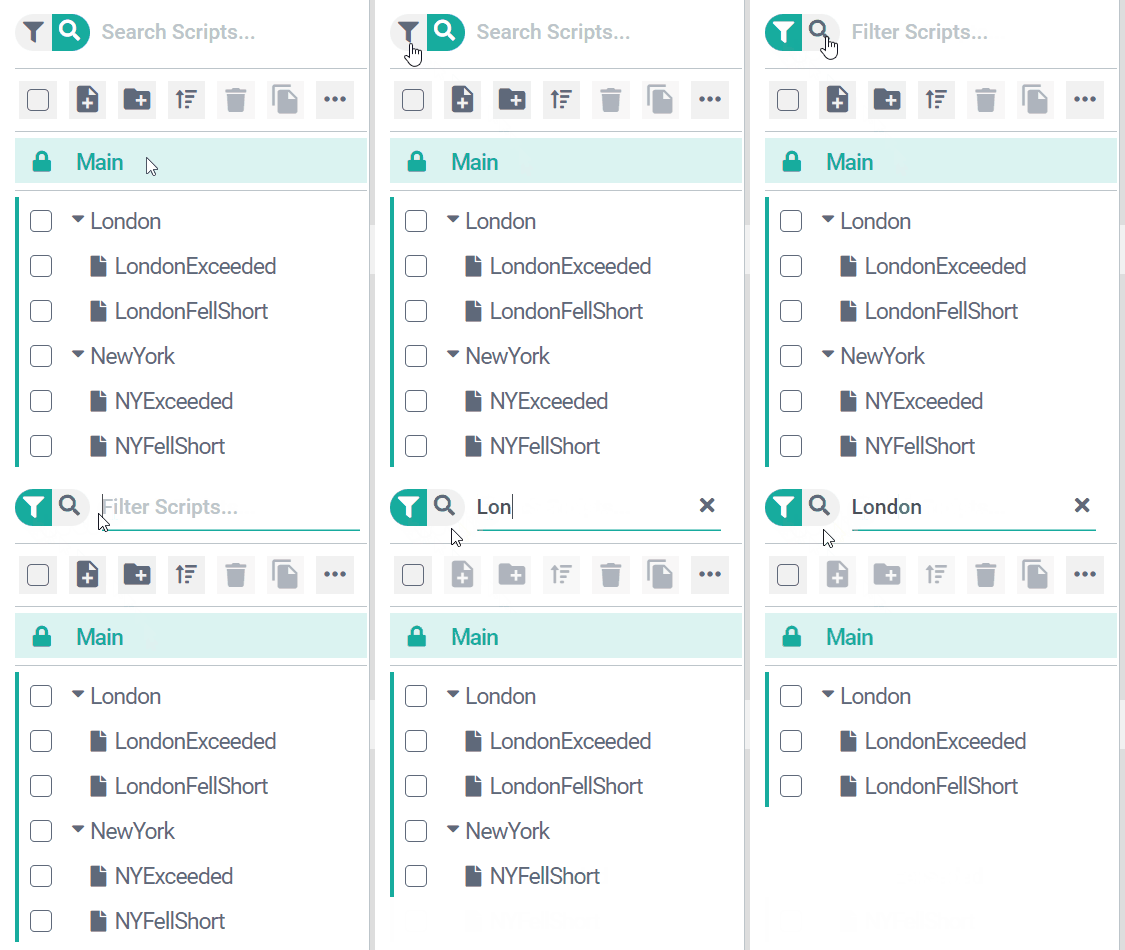
Searching for script content
To search for specific text within your scripts, toggle the Filter/Search button to Search and type your search term. All scripts containing your search term are displayed.
Suppose you have a now-deleted variable in numerous scripts and you want to identify every script containing that variable. Searching for the variable name — e.g. Drivers — filters the script panel so that only scripts containing the variable appear.
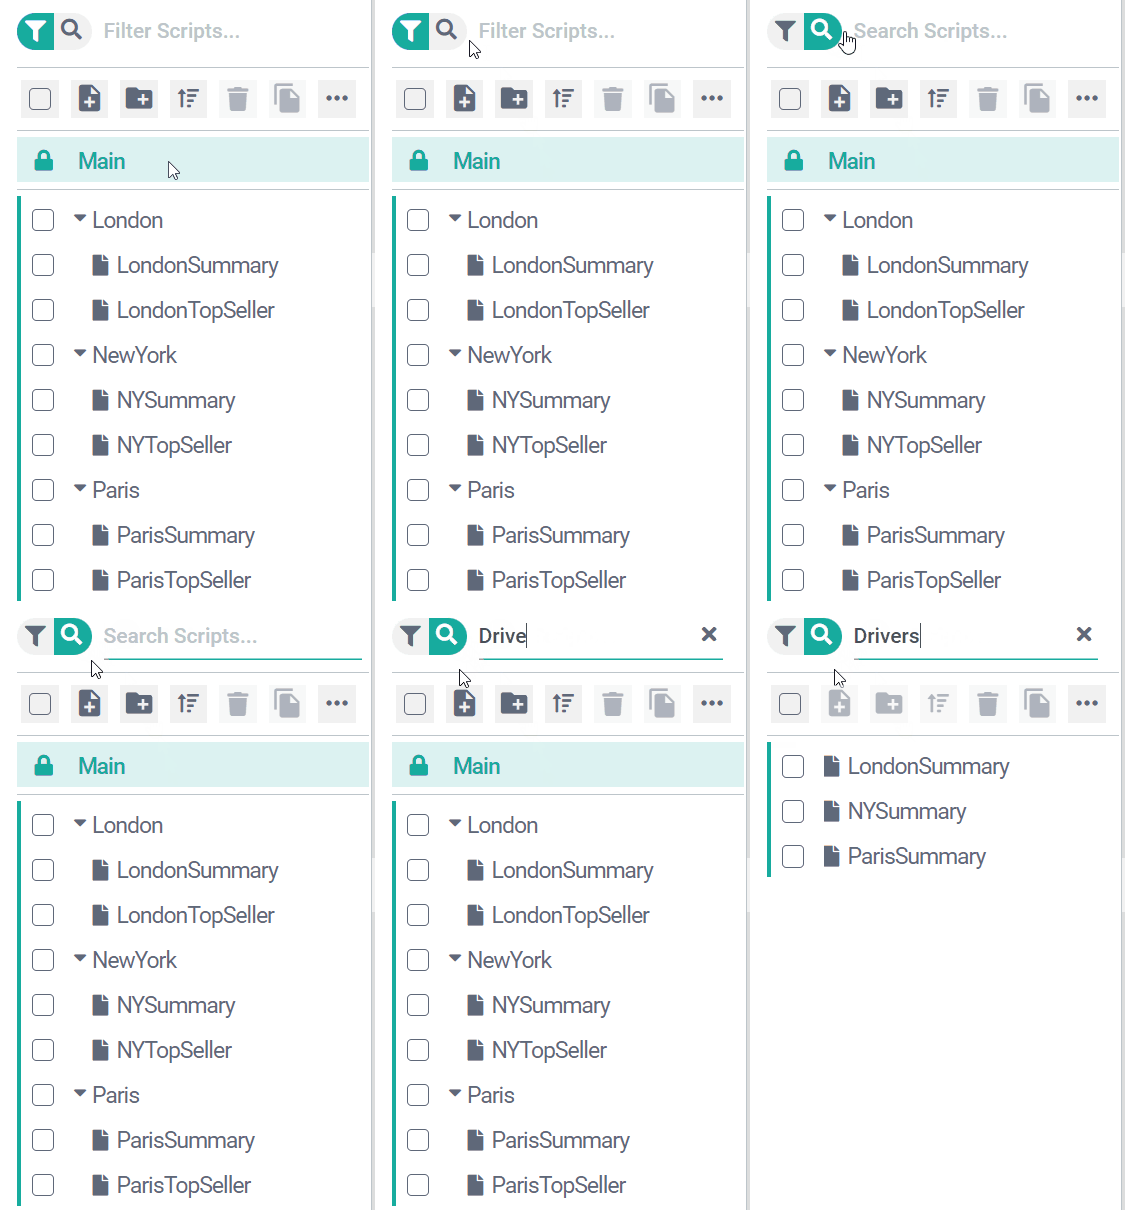
Note
The search is case-insensitive.
Tip
You can also find text within a specific script — see Find and replace (ATL View) for guidance.