HTML tables
You can create HTML tables in your project by using the decodeHtml function. This topic explains how to create a table and then explains the different ways you can format it to your liking.
Tip
It's easier to follow this content if you download and open the HTML tables example project.
Creating HTML tables
The decodeHtml function supports the following table and table element tags: <table>, <th>, <td>, <tr>, <thead>, <tfoot>, and <tbody>.
The example project has the following JSON data:
{
    "finances": [
        {
            "branch": "San Francisco",
            "state": "California",
            "sales": 198248.33
        },
        {
            "branch": "Dallas",
            "state": "Texas",
            "sales": 267321.77
        },
        {
            "branch": "Baltimore",
            "state": "Maryland",
            "sales": 182434.78
        }
    ]
}
You can display this data in a simple table using the following ATL:
[[decodeHtml("<table><tr><th>Branch</th><th>State</th><th>Sales</th></tr>")]][[forAll(WholeJSON.finances, x -> decodeHtml(joinStrings("<tr><td>", x.branch, "</td><td>", x.state, "</td><td>", currencyFormat(x.sales), "</td></tr>")))]][[decodeHtml("</table>")]]
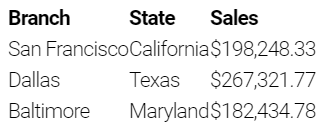
This table has no formatting, which makes it unsuitable for inclusion in a report.
This is how the table is displayed in Studio's Preview mode:
The next section shows how to apply formatting.
Tip
When you run your project through the API, an unformatted HTML table like that above might appear slightly different from how it appears in Studio's Preview mode. If so, this is caused by your browser's default formatting. Explicitly defining styles will override your browser's default formatting. See the examples below.
Formatting HTML tables
There are two ways to apply formatting to an HTML table created in Studio:
METHOD 1: APPLY A CLASS ATTRIBUTE TO THE TABLE
You can apply a CSS class attribute to the HTML table element. This is best when you are using your published Studio project dynamically as part of another web application.
Using the same example as above, you could amend the ATL to:
[[decodeHtml("<table class='myTableStyle'><tr><th>Branch</th><th>State</th><th>Sales</th></tr>")]][[forAll(WholeJSON.finances, x -> decodeHtml(joinStrings("<tr><td>", x.branch, "</td><td>", x.state, "</td><td>", currencyFormat(x.sales), "</td></tr>" )))]][[decodeHtml("</table>")]]
The changes are highlighted in red in the image below:

The class attribute 'myTableStyle' has been applied to the HTML table element. You can name the class attribute whatever you like. Once added, you can use this attribute to define the CSS styling for the table — just add appropriate CSS styling for the attribute in the CSS file for the web application you are using to display the project output.
Note
This method does not alter the table's appearance in Studio's preview mode.
METHOD 2: APPLY INLINE FORMATTING
Alternatively, you can add inline style attributes to the various HTML elements that make up your table. For example, here is our example table without formatting:
[[decodeHtml("<table><tr><th>Branch</th><th>State</th><th>Sales</th></tr>")]][[forAll(WholeJSON.finances, x -> decodeHtml(joinStrings("<tr><td>", x.branch, "</td><td>", x.state, "</td><td>", currencyFormat(x.sales), "</td></tr>")))]][[decodeHtml("</table>")]]
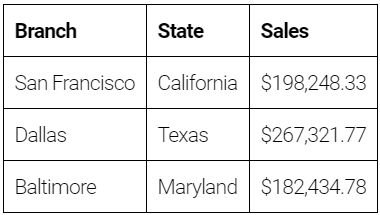
In the following ATL, inline formatting has been applied to add borders and padding:
[[decodeHtml("<table style='border:1px solid black; padding:7px; border-collapse: collapse'><tr><th style='border:1px solid black; padding:7px; text-align:left'>Branch</th><th style='border:1px solid black; padding:7px; text-align:left'>State</th><th style='border:1px solid black; padding:7px; text-align:left'>Sales</th></tr>")]][[forAll(WholeJSON.finances, x -> decodeHtml(joinStrings("<tr><td style='border:1px solid black; padding:7px'>", x.branch, "</td><td style='border:1px solid black; padding:7px'>", x.state, "</td><td style='border:1px solid black; padding:7px'>", currencyFormat(x.sales), "</td></tr>")))]][[decodeHtml("</table>")]]
The changes are highlighted in red below:

This appears as below. You can try this yourself with the InlineFormatting1 script in the example project.
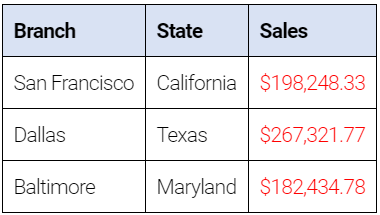
You could further format the table by applying a background color to the header row cells and red coloring to the sales figures:
[[decodeHtml("<table style='border:1px solid black; padding:7px; border-collapse: collapse'><tr><th style='border:1px solid black; padding:7px; background:#d9e2f3; text-align:left'>Branch</th><th style='border:1px solid black; padding:7px; background:#d9e2f3; text-align:left'>State</th><th style='border:1px solid black; padding:7px; background:#d9e2f3; text-align:left'>Sales</th></tr>")]][[forAll(WholeJSON.finances, x -> decodeHtml(joinStrings("<tr><td style='border:1px solid black; padding:7px'>", x.branch, "</td><td style='border:1px solid black; padding:7px'>", x.state, "</td><td style='border:1px solid black; padding:7px; color:red'>", currencyFormat(x.sales), "</td></tr>")))]][[decodeHtml("</table>")]]
The changes are highlighted in red below:

This appears as below. You can try this yourself with the InlineFormatting2 script in the example project.
Note
When you print the special variable WholeTable, or a table region returned by an ATL function, the HTML table produced has two style classes attached to it: <table class="table table-bordered">.
You cannot change how these tables appear in the Studio preview, but you can change how they appear in another web application — just add appropriate CSS styling for the above-mentioned classes in the application's CSS file.
